US Car Tool 84-01 Jeep Cherokee Lower&Upper Control Arm Stiffeners
The control arms on your Jeep Cherokee are not designed to take much off-road abuse. Frankly, they were not designed to take much on-road abuse either! The US Car Tool control arm stiffeners add an incredible amount of strength to the factory upper and lower control arms. They weld to the factory control arms add stiffness, support, rigidity and strength.
The US Car Tool Cherokee Control Arm stiffening system starts by boxing in the control arm. Where the factory version uses a U shape section of sheet metal, the US Car Tool stiffening system fully boxes in the control arm. And we do it using awfully thick steel, more than tripling the total steel thickness of the control arm, plus adding the boxed in structure. It all adds up to an amazingly strong result: Wicked stiff control arms, upper and lowers.
What is our off-road parts philosophy? That�s simple; nothing overbuilt ever broke. And since the stiffening system welds to your factory (or replacement) control arms, there is no change in steering, suspension, height or chassis geometry. You add strength, you add rigidity, you eliminate an opportunity for failure (at the most inconvenient time � when off-road).
The US Car Tool Jeep Cherokee Control Arm stiffening system support plates are a weld-on solution and designed to be added to your existing (or replacement) upper and lower control arms. Many of our customers find that new control arms are available very inexpensively and simply purchase new control arms and weld the stiffening system control plates to the new control arms and then install them. The stiffening system is an easy weld-on install. It makes a great welding project and is an easy way to add strength to your Jeep Cherokee.
Any Comments or Questions Call Us @ (919) 855-8200

Dodge, Plymouth A-Body 63-66
This kit Fits the Plymouth A Bodies from 1963 through 1966. We have another kit for the 63-66 Dodge, the wheelbase is different and requires a different frame connectors!!
Each US Car Tool Chassis Stiffening kit includes:
- A Pair of Frame Connectors
- A set of four Hot Rod Torque boxes
- A pair of front inner fender braces
- A front lower core support frame brace
Purchasing these chassis stiffening components as a kit will save substantially over purchasing these individually.
FAQ's
Where does the Chassis Stiffening Kit mount?
The kit mounts to the unibody of your A-Body Mopar and adds strength and stiffening to the entire unibody structure. This the most complete kit and adds the most strength available, short of adding a full roll cage to your car.
Does my car need a Chassis Stiffening Kit?
The factory engineers added stiffening to some ares of the A-Bodies, so they recognized the benefits of the bracing 40+ years ago. We've just got the benefit of seeing how these react to the added chassis stiffening. Any car will benefit from the additional chassis (unibody) stiffening, especially if you are increasing the horsepower or just want you car to feel more "solid" going down the road.
Frame Connectors add strength to the middle portion of the unibody, our design maximizes the strength of these via cantilever beam engineering to increase the Section Modulus of Elasticity. This is twice as strong at half the thickness!!
Torque Boxes distribute the brute forces placed on the Unibody at active suspension mounting locations; think front leaf spring hangers pushing the car forward on a 600hp launch!
Inner Fender Braces add stiffening to a front frame rail system that was prone to twisting.
The front Lower Core Support brace connects the extreme front ends of the front frame rails to help make them stronger and less prone to twisting.
When you remove the flex from your chassis (Unibody) you allow the suspension to work as it is designed. Now you can adjust spring rate, roll resistance (sway bars) and shocks and actually see and feel the difference!
Are these duplicates of the OEM factory Braces?
No, we build a version we refer to as our Hot Rod Brace Upgrade. Some of the stiffening components fit in the factory location, such as the torque boxes and inner fender braces, other components just add strength to known weak spots on the unibody.Do these require welding?Yes, installing a Chassis Stiffening Kit requires them to be welded into position.
Will you install the components onto my car?
Yes, our installation center installs all the parts we manufacture for a set low price.
.
Im not sure exactly what I need for my MOPAR suspension upgrade, can you suggest an upgrade to my car?
Yes, we have installed chassis stiffening components on 100's of MOPAR's and have been in business saving old MOPAR's for over 10 years. Contact us at (800) 843-2821 with any additional questions - we like to help!!

Dodge, Plymouth A-Body 63-66
This kit Fits the Dodge A Bodies from 1963 through 1966. We have another kit for the 63-66 Plymouth, the wheelbase is different
and requires a different frame connectors!!Each US Car Tool Chassis Stiffening kit includes:
- A Pair of Frame Connectors
- A set of four Hot Rod Torque boxes
- A pair of front inner fender braces
- A front lower core support frame brace
Purchasing these chassis stiffening components as a kit will save substantially over purchasing these individually.
FAQ's
Where does the Chassis Stiffening Kit mount?
The kit mounts to the unibody of your A-Body Mopar and adds strength and stiffening to the entire unibody structure. This the most complete kit and adds the most strength available, short of adding a full roll cage to your car.
Does my car need a Chassis Stiffening Kit?
The factory engineers added stiffening to some ares of the A-Bodies, so they recognized the benefits of the bracing 40+ years ago. We've just got the benefit of seeing how these react to the added chassis stiffening. Any car will benefit from the additional chassis (unibody) stiffening, especially if you are increasing the horsepower or just want you car to feel more "solid" going down the road.
Frame Connectors add strength to the middle portion of the unibody, our design maximizes the strength of these via cantilever beam engineering to increase the Section Modulus of Elasticity. This is twice as strong at half the thickness!!
Torque Boxes distribute the brute forces placed on the Unibody at active suspension mounting locations; think front leaf spring hangers pushing the car forward on a 600hp launch!
Inner Fender Braces add stiffening to a front frame rail system that was prone to twisting.
The front Lower Core Support brace connects the extreme front ends of the front frame rails to help make them stronger and less prone to twisting.
When you remove the flex from your chassis (Unibody) you allow the suspension to work as it is designed. Now you can adjust spring rate, roll resistance (sway bars) and shocks and actually see and feel the difference!
Are these duplicates of the OEM factory Braces?
No, we build a version we refer to as our Hot Rod Brace Upgrade. Some of the stiffening components fit in the factory location, such as the torque boxes and inner fender braces, other components just add strength to known weak spots on the unibody.Do these require welding?Yes, installing a Chassis Stiffening Kit requires them to be welded into position.
Will you install the components onto my car?
Yes, our installation center installs all the parts we manufacture for a set low price.
.
Im not sure exactly what I need for my MOPAR suspension upgrade, can you suggest an upgrade to my car?
Yes, we have installed chassis stiffening components on 100's of MOPAR's and have been in business saving old MOPAR's for over 10 years. Contact us at (919) 855-8200 with any additional questions - we like to help!!
Fits: 70-74 E Body Dodge Challenger
Fits: 70-74 Plymouth Cuda E Body
Fits: 67-75 Dart/Valiant A-Body
Fits: 62-65 Dodge Plymouth B-Body (except 63 and 64 Dodge)
Fits: 1963-64 Dodge Only B-Body
Fits: 71-72 Dodge & Plymouth B-Bodies
Fits: 1966-70 Charger & Coronet
Fits: 67-75 A-Bodies (Dart&Valiant)
Fits: 63-65 B-Bodies (Dodge&Plymouth)
Fits: 63&64 B-Bodies (Dodge Only)
Fits: 1970-74 Dodge Challenger
Fits 1970-74 Plymouth Barracuda & Cuda
Fits: 1966-70 Plymouth Satellite & Road Runner
Fits: 1963-66 Dodge Dart A Body
F Body Frame Connector fits 74-80 Volare / Roadrunners
CNC Machine cut from 12ga thick steel (original factory rails are made from 16 gauge material) and CNC bent for a precision fit, these frame rail connectors are designed to be welded in to your existing unibody floor pan. No cutting of the floorpan is required and once welded in, they create a fully boxed frame rail connector that is stronger than the original factory frame rails!! These frame connectors fit F-Body cars available in 74 through 80 - whether Dodge or Plymouth. Requires Welding.
Weld in Frame Connector for 78-79 Dodge Magnum with isolated front torsion bars and passenger side catalytic converter.
Fits: 73-75 B-Body Dodge/Plymouth w/o Catalytic converter
Fits: 1963-66 Dodge/Plymouth ABody
Front Lower Core Support Brace. installs between the front frame rails, under the factory radiator. Can replace the factory thin sheet metal support or can be installed on top of the factory core support. Adds rigidity to the extreme front of the factory frame rails. 1967-1975 Mopar A-Bodies
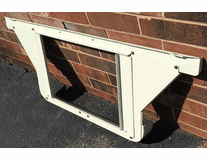
The US Car Tool radiator core support is made from 12ga steel (twice as thick as than the OEM sheet metal) and adds much needed stiffening to the front frame rails and inner fenders while maintaining that stock OEM look. Adjustable to fit any radiator, from 22" up to a mammoth 28� wide C-Body radiator or aftermarket Aluminum radiator. (The front frame rails are the limiting factor to radiator width on an A-Body Mopar).
The unique design of the US Car Tool radiator core support provides an extra � inch of much needed space between the radiator and the water pump to provide room for the largest of electric fans or serpentine belt drives. The US Car Tool radiator core support adds stiffness to the car�s unibody, allows you to run a large radiator and provides more clearance in the engine bay.
Flat Packed for lower cost shipping, requires welding and assembly. Shipping weight 25 lbs, installed weight 22 lbs.
Whether at a drag race, on a road course or carving corners on the street, the US Car Tool radiator core support makes your car better.
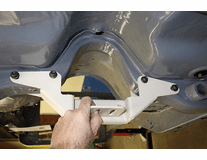
These torque boxes are designed to add strength to your Mopar unibody in several critical areas. The factory added OEM torque boxes on the high-HP, high torque cars and convertibles. Hemi cars, six-pak cars etc. had torque boxes added by the factory engineers. Our interpretation of the OEM pieces improves on that proven design. We made them stronger by using 1/8" thick steel and having them CNC Machine cut and CNC bent.
This is a complete set of (4) torque boxes, left & right fronts, left & right rears.
Fits 1966-70 Dodge & Plymouth B body
Fits: 1966-70 Dodge/Plymouth B body
Fits: 1967-75 Dodge/Plymouth A Body
Reproduction 1969 Dodge Superbee and Plymouth Roadrunner lift off sixpak hood brackets. These high quality hood brackets fit 1966-1970 B-Body cars and support the rear hood pins in the OEM factory. Take the weight off of your classic Mopar, replace the steel hood with fiberglass lift off style and use these lift off hood reproduction brackets to hold it securely in position.
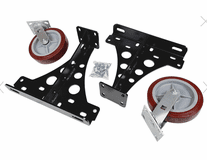
Mopar Body wheel set. This is a set of four (4) body wheels that bolt onto your unibody so you can roll the empty body wheel around in your shop or take it onto your trailer to go to the paint shop etc. Each set includes two front 8" ball bearing swivel caster body wheels and two 8" fixed rear caster body wheels. the rear brackets bolt onto the leaf spring mounting locations. The front brackets are specially designed, laser cut, formed and welded to allow bolting onto either front bumper mounting location or the K-frame bolting locations. Each set fits ALL A, B and E body cars - you can use the same set for your Dart AND your 71 Hemi Cuda! Brackets are powdercoated in wrinkle black for years of great looks, even in the roughest garage environment. We use them in our shop all the time!
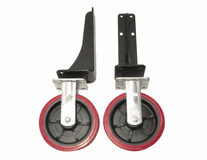
Mopar Body wheel set. This is a pair of front brackets and (2) body wheels that bolt onto your unibody so you can roll the empty body wheel around in your shop or take it onto your trailer to go to the paint shop etc. Each set includes two front 8" ball bearing swivel caster body wheels. The front brackets are specially designed, laser cut, formed and welded to allow bolting onto either front bumper mounting location or the K-frame bolting locations. Each set fits ALL A, B and E body cars - you can use the same set for your Dart AND your 71 Hemi Cuda! Brackets are powdercoated in wrinkle black for years of great looks, even in the roughest garage environment. We use them in our shop all the time! FRONTS ONLY.
Mopar Body wheel set. This is a pair of front brackets and (2) body wheels that bolt onto your unibody so you can roll the empty body wheel around in your shop or take it onto your trailer to go to the paint shop etc. Each set includes two front 8" ball bearing swivel caster body wheels. The front brackets are specially designed, laser cut, formed and welded to allow bolting onto either front bumper mounting location or the K-frame bolting locations. Each set fits ALL C body cars from 65 through 72. FRONTS ONLY.
Mopar Body wheel set. This is a pair of Rear brackets and (2) body wheels that bolt onto your unibody so you can roll the empty body wheel around in your shop or take it onto your trailer to go to the paint shop etc. Each set includes two rear 8" ball bearing fixed caster body wheels. The rear brackets are specially designed to bolt to the leaf spring front hanger location. Each set fits ALL Mopar A/B/C/E body cars. REARS ONLY.
Dodge LX Body wheel set. This is a set of two Front body wheel brackets and 8" solid caster wheels. Perfect to roll your Charger R/T body around in your shop or take it onto your trailer to go to the paint shop etc. Each set includes two front 8" ball bearing swivel caster body wheels. The front brackets are specially designed, formed and welded to allow bolting onto the K-frame bolting locations. Each set fits ALL Mopar Dodge LX body cars. Brackets are powdercoated in wrinkle black for years of great looks, even in the roughest garage environment. We use them in our shop all the time!
These are adapters for the USCT Motorsports K-frame stand. They permit using the K-frame stand with a non factory OEM tublar style K-frame such as the RMS Alterktion or the Magnumforce K-frames. You will receive two (2) adapters and they mount on the top of the K-frame stand uprights, this permits any square or round tube member of the aftermarket K-frame to be supported by the USCT Motorsports K-frame stand.
Fits: 1966-70 Dodge B Body

Engineered to facilitate installing a GM GM2004R overdrive automatic transmission into a Dodge/Plymouth Mopar A Body car. Requires additional fabrication and welding. Replacement center section for the factory transmission cross-member center section, includes transmission mount. This is used when a non-OEM transmission is installed into a Factory car and additional clearance is required for the transmission tail-shaft and the speedometer or VSS cable/sensor. The factory floor remains in the original location, requires removal of the factory torsion bar cross-member center section and welding in the replacement USCT transmission cross-member. The USCT cross-member is a fully boxed section, engineered to provide the structural integrity that would be lost by removing the factory cross-member. The kit includes the cross-member, lower transmission mount, Grade 8 mounting hardware and instructions for installation. The components are all factory jig tack-welded, ready for seam welding during installation. Requires fabrication and welding to install.
Ever wanted to gain more room for bigger tires in your classic Mopar but thought that moving the wheel tubs was too much work? US Car Tool has created a kit to save you time and money for just that! This kit allows you to Mini-Tub your Mopar in a weekend with our pre-fabricated wheel tub filler and spring relocation kit. US Car Tool's Brand New Mini-Tub and Rear Spring Relocation combo includes: Pre-Fabricated Wheel Tub Fillers -Trunk Hinge Braces Extensions -Cut Templates -Spring buckets -Shackle brackets and sleeves -Spring Perches -Step by Step instructions
Ever wanted to gain more room for bigger tires in your classic Mopar but thought that moving the wheel tubs was too much work? US Car Tool has created a kit to save you time and money for just that! This kit allows you to Mini-Tub your Mopar in a weekend with our pre-fabricated wheel tub filler and spring relocation kit. US Car Tool's Brand New Mini-Tub and Rear Spring Relocation combo includes: Pre-Fabricated Wheel Tub Fillers -Trunk Hinge Braces Extensions -Cut Templates -Spring buckets -Shackle brackets and sleeves -Spring Perches -Step by Step instructions
US Car Tool Mopar Spring Perches
The US Car Tool leaf spring perch is well designed for your specific needs. The correct width, length and height with precisely sized location holes to fit your leaf spring locating tab. Built as an exact factory replacement part, these will fit any differential housing with a standard 3.125 inch tube such as the Mopar 8.75 and Spicer Dana 60 rear. Please note: many other replacement perches use an incorrectly oversized center registration hole and require welding in a bushing to fit vintage muscle applications. The US Car Tool spring perches are precisely engineered to fit correctly.
CNC cut and Precision CNC bent, the spring perches are manufactured in the US from thick 3/16�€ mild steel. Why do we make them out of thicker steel than the originals? Our philosophy is simple; nothing overbuilt ever broke.

US Car Tool's Brand New 70-74 E-Body Mini-Tub Kit!!
Fits all Challengers and Cuda's E-Bodies 1970-1974 (except convertibles)
Ever wanted to gain more room for bigger tires in your vintage E-body Mopar but thought that moving the wheel tubs was to much work?
US Car Tool has created a kit to save you time and money for just that!
This kit allows you to Mini-Tub your E-body Mopar in a weekend with our pre-fabricated wheel tub filler, gain up to 15" clearance between the frame rail and the wheel lip - enough for a 355/30-19 tire.
Includes:
Set Of Pre-Fabricated Wheel Tub Fillers
Set Of Frame Rail Notch Templates (metal)
Set Of Frame Rail Notch Panels
Set Of Frame Rail Notch inner braces
Frequently Asked Questions:
Whats the biggest wheel and tire i can fit after installing a mini-tub and spring relocation?
Its hard to give sizes that are concrete due to the shape of the wheelhouse, ride height, and wheelbase. You will have 15" clearance between the frame and the outer quarter panel lip in the center of the tire. You can even roll the lip for more room, but 15" is an enormous amount of room. When our mini-tub kit is installed with our rear spring relocation kit, this will allow for maximum tire size. The actual size tire that can be fit in the wheelhouse will depend on many factors including wheelhouse shape, size, ride height of vehicle, wheel backspace, wheel diameter, tire diameter, tire width, axle width. All these play an important part in selecting the correct size for your application.
Examples of tire size and wheel combinations we have used on E-bodies:
1971 Plymouth Cuda: 355x30x19 Tire
Does the rear end need to be shortened?
The rear may need to be shortened depending on your wheel offset, this will require mock-up and measuring to be correct.
Will the rear seat still fit?
The rear seat may need modification along with the inner quarter window interior panel.
Do the seat belts still work?
The outboard seat belt anchor will move inboard with the inner wheelhouse and the seat belts will continue to work.
Does this require different shock?
If you narrow the rear, the shocks would ideally need to be shorter and will also depend on ride height, so mock up and measurement is required to get the right length.
Do you install these for customers?
Yes we do, just give us a call to schedule an installation appointment.
How much work is required for the install?
We allow 4 days to perform a complete mini tub installation in our install center.
We have more pictures of the mini-tub process on our website at www.uscartool.com under the pictures section.
Any questions give us a call at (919) 855-8200
Ever wanted to gain more room for bigger tires in your classic Mopar but thought that moving the wheel tubs was too much work? US Car Tool has created a kit to save you time and money for just that! This kit allows you to Mini-Tub your Mopar in a weekend with our pre-fabricated wheel tub filler and spring relocation kit. US Car Tool's Brand New Mini-Tub and Rear Spring Relocation combo includes: Pre-Fabricated Wheel Tub Fillers -Trunk Hinge Braces Extensions -Cut Templates -Spring buckets -Shackle brackets and sleeves -Spring Perches -Step by Step instructions
| 71-72 B-Body Spring Relocation |

Engineered to facilitate installing a Chrysler 518 overdrive automatic transmission into a Dodge/Plymouth Mopar A Body car. Requires additional fabrication and welding.
Made from 3/16 thick steel, this replaces the factory transmission cross-member transmission mount. Provides the additional height and width required to for the 518 Transmission. Additional clearance may be required including cutting the factory crossmember for the transmission tail-shaft and the speedometer or VSS cable/sensor. The factory floor remains in the original location. Requires welding in the replacement USCT transmission mount tab. The tab is designed to accept the common GM 2 bolt style mount transmission insulator. The USCT cross-member is a fully boxed section, engineered to provide the structural integrity that would be lost by removing the factory cross-member. The kit includes the cross-member, lower transmission mount tab, Grade 8 mounting hardware and instructions for installation. The GM style insulator is not included and is available in almost every auto parts store. The components are factory jig welded, ready for installation. Requires fabrication and welding to install.

US Car Tool's Brand New 71-73 B-Body Mini-Tub Kit!!
Fits Charger's B-Bodies 1970-1973
Ever wanted to gain more room for bigger tires in your vintage E-body Mopar but thought that moving the wheel tubs was to much work?
US Car Tool has created a kit to save you time and money for just that!
This kit allows you to Mini-Tub your B-body Mopar in a weekend with our pre-fabricated wheel tub filler, gain up to 15" clearance between the frame rail and the wheel lip - enough for a 29x15.50R15 tire.
Includes:
Frequently Asked Questions:
Whats the biggest wheel and tire i can fit after installing a mini-tub and spring relocation?
Its hard to give sizes that are concrete due to the shape of the wheelhouse, ride height, and wheelbase. You will have 15" clearance between the frame and the outer quarter panel lip in the center of the tire. You can even roll the lip for more room, but 15" is an enormous amount of room. When our mini-tub kit is installed with our rear spring relocation kit, this will allow for maximum tire size. The actual size tire that can be fit in the wheelhouse will depend on many factors including wheelhouse shape, size, ride height of vehicle, wheel backspace, wheel diameter, tire diameter, tire width, axle width. All these play an important part in selecting the correct size for your application.
Examples of tire size and wheel combinations we have used on B-bodies:
1971 Charger: 355x30x19 Tire
Does the rear end need to be shortened?
The rear may need to be shortened depending on your wheel offset, this will require mock-up and measuring to be correct.
Will the rear seat still fit?
The rear seat may need modification along with the inner quarter window interior panel.
Do the seat belts still work?
The outboard seat belt anchor will move inboard with the inner wheelhouse and the seat belts will continue to work.
Does this require different shock?
If you narrow the rear, the shocks would ideally need to be shorter and will also depend on ride height, so mock up and measurement is required to get the right length.
Do you install these for customers?
Yes we do, just give us a call to schedule an installation appointment.
How much work is required for the install?
We allow 4 days to perform a complete mini tub installation in our install center.
We have more pictures of the mini-tub process on our website at www.uscartool.com under the pictures section.
Any questions give us a call at (919) 855-8200
Engineered to facilitate installing a Chrysler 518 overdrive automatic transmission into a Dodge/Plymouth Mopar E Body car. Requires additional fabrication and welding.
Made from 3/16 thick steel, this replaces the factory transmission cross-member transmission mount. Provides the additional height and width required to for the 518 Transmission. Additional clearance may be required including cutting the factory crossmember for the transmission tail-shaft and the speedometer or VSS cable/sensor. The factory floor remains in the original location. Requires welding in the replacement USCT transmission mount tab. The tab is designed to accept the common GM 2 bolt style mount transmission insulator. The USCT cross-member is a fully boxed section, engineered to provide the structural integrity that would be lost by removing the factory cross-member. The kit includes the cross-member, lower transmission mount tab, Grade 8 mounting hardware and instructions for installation. The GM style insulator is not included and is available in almost every auto parts store. The components are factory jig welded, ready for installation. Requires fabrication and welding to install.
1963-1975 Mopar A-Body Leaf Spring Relocation Kit REAR SHACKLES
This is the two rear frame shackle mounts and bushing sleeves only. 1 left and 1 right. Designed to upgrade other kits that do not include the correct frame sleeve / shackle bushing or to replace damaged ones on your car.
These rear frame sleeves bolt to the A-Body original rear shackle bracket mount location so you are assured the new frame shackle bushing is located in the correct position for the rear leaf spring mounting.
Includes two (2) new bushing sleeves. Requires cutting / welding. Note: These are included in the USCT Spring Relocation kits for A-body cars, only purchase these to upgrade a different kit or replace your damaged parts.
1966-1970 Mopar B-Body Leaf Spring Relocation Kit REAR SHACKLES
This is the two rear frame shackle mounts and bushing sleeves only. 1 left and 1 right. Designed to upgrade other kits that do not include the correct frame sleeve / shackle bushing or to replace damaged ones on your car.
These rear frame sleeves go over the factory rear frame and include a tool to properly locate them off the original rear shackle bracket mount location so you are assured the new frame shackle bushing is located in the correct position for the rear leaf spring mounting.
Includes two (2) new bushing sleeves. Requires cutting / welding. Note: These are included in the USCT Spring Relocation kits for B-body cars, only purchase these to upgrade a different kit or replace your damaged parts.
Small block LA platform fuel pump block off plate. Powder coated.

Complete Body Bolt Fastener Kit Set for A Bodies
This kit has all the fasteners you need to install all the bolt on body panels onto your Mopar Classic A Body Auto.
Includes 88 pieces: Dog Point Bolts, Slip on Nuts, Studs and captured washer nuts - All correct and complete.
Each Kit comes with:
Upper Fender to Inner Fender slip-on nuts and dog point bolts with built in washer
Front core support to Fender slip on nuts and dog point bolts with built in washer
Lower Fender to rocker deep slip-on nuts, stud and washer with captured nut
Hood to Hood Hinge bolts
Hood Hinge to Inner Fender bolts
Door Hinge to Door bolts (upper and lower)
Door Hinge to A Pillar body bolts (upper and lower)
Decklid to Decklid Hinge bolts
This is the most complete kit available and uses all the correct fasteners, in the correct lengths and styles, includes a total of 88 pieces. For instance, check the lower fender stud slip-on nuts; we supply the correct long style so the stud is located in the correct factory location on the rocker. We have been assembling and using these kits for years in our in-house restoration facility and now are making them available.
These kits fit all the A Body mopars from 1967 through 1975.

Complete Body Bolt Fastener Kit Set
This kit has all the fasteners you need to install all the bolt on body panels onto your Mopar Classic B Body Auto.
Includes 88 pieces: Dog Point Bolts, Slip on Nuts, Studs and captured washer nuts - All correct and complete.
Each Kit comes with:
Upper Fender to Inner Fender slip-on nuts and dog point bolts with built in washer
Front core support to Fender slip on nuts and dog point bolts with built in washer
Lower Fender to rocker deep slip-on nuts, stud and washer with captured nut
Hood to Hood Hinge bolts
Hood Hinge to Inner Fender bolts
Door Hinge to Door bolts (upper and lower)
Door Hinge to A Pillar body bolts (upper and lower)
Decklid to Decklid Hinge bolts
This is the most complete kit available and uses all the correct fasteners, in the correct lengths and styles, includes a total of 88 pieces. For instance, check the lower fender stud slip-on nuts; we supply the correct long style so the stud is located in the correct factory location on the rocker. We have been assembling and using these kits for years in our in-house restoration facility and now are making them available.
These kits fit all the B Body mopars from 1966 through 1970.

Cuda Challenger E-Body
Fender/Door/Hood/Fender/Deck lid Bolt Fastener Kit Set
This kit has all the fasteners you need to install all the bolt on body panels onto your Mopar Classic E Body Auto.
Includes 88 pieces: Dog Point Bolts, Slip on Nuts, Studs and captured washer nuts - All correct and complete.
Each Kit comes with:
Upper Fender to Inner Fender slip-on nuts and dog point bolts with built in washer
Front core support to Fender slip on nuts and dog point bolts with built in washer
Lower Fender to rocker deep slip-on nuts, stud and washer with captured nut
Hood to Hood Hinge bolts
Hood Hinge to Inner Fender bolts
Door Hinge to Door bolts (upper and lower)
Door Hinge to A Pillar body bolts (upper and lower)
Decklid to Decklid Hinge bolts
This is the most complete kit available and uses all the correct fasteners, in the correct lengths and styles, includes a total of 88 pieces. For instance, check the lower fender stud slip-on nuts; we supply the correct long style so the stud is located in the correct factory location on the rocker. We have been assembling and using these kits for years in our in-house restoration facility and now are making them available.
These kits fit all the E Body mopars from 1970 through 1974.
Fits: Late 1970-74 E Body
The US Car Tool Uni-Lift allows the front end of your 1966 to 1975 Mopar A/B/E Body to be lifted over 5' in the air for easy installation or removal of the front suspension. The Uni-lift bolts to the front bumper mounts on the front frame rails and is CNC machine cut with the bolt patterns for Mopar A, B & E bodies. Other patterns can be accommodated with a simple modification. The Uni-lift comes Powdercoated and is fully adjustable to fit any car body. Requires an engine hoist (not included) to safely lift the front of your car body with the rear tires on the ground. Combine this tool with our US Car Tool K-Frame stand for a great restoration engine installation experience!! Hoist and Car not included (smile).
Call us if your car is not listed here.
The US Car Tool Uni-Lift allows the front end of your 1962 to 1965 Mopar early B Body to be lifted over 5' in the air for easy installation or removal of the front suspension. The Uni-lift bolts to the front bumper mounts on the front frame rails and is CNC machine cut with the bolt patterns for Mopar A, B & E bodies. Other patterns can be accommodated with a simple modification. The Uni-lift comes Powdercoated and is fully adjustable to fit any car body. Requires an engine hoist (not included) to safely lift the front of your car body with the rear tires on the ground. Combine this tool with our US Car Tool K-Frame stand for a great restoration engine installation experience!! Hoist and Car not included (smile).
Call us if your car is not listed here.
The kit is complete with everything you need to construct our AutoBody Rotisserie
Complete Spindle to Spindle Rebuild service
- Complete Disassemble & strip to bare metal
- Inspect and repair (weld K-frame etc.)
- Powdercoat and/or detail to factory OEM appearance
- All new Bushings, Ball joints, Tie rod ends, bump stops
- your choice of OEM rubber or Poly
- Assemble, ready for installation and final torque
Options:
- Tubular Upper Control Arms $400
- Sway Bar - add $125
- Torsion Bars - add $75
- Brake rebuild service - price based on application
- New LCA Pivots $65
- New torsion bar adjusters $75
- New Brake Strut Rods Steel $120 (powdercoated)
- New Brake Strut Rods Aluminum $ $150 (natural)